Go from your first image to a consistent visual system. Follow the lessons in order or open the topic you need now.
Midjourney basics · 10 min · Beginner
How to Use Midjourney
Learn the complete Midjourney workflow—from entering a prompt and refining variations to editing, generating 2K HD images, and exporting the final result.
Recommended learning pathBasics → Prompts → Brand practice
What you will learn
After this tutorial, you will be able to
Generate your first image on the Midjourney website or in Discord
Choose a candidate and refine it with variations and editing tools
Use SD and HD strategically to save GPU time and export a polished image
01 · Enter a prompt and generate images
Midjourney starts with a prompt: a short description of the image you want. On midjourney.com, open the Create page, type your description in the Imagine bar, and press Enter. A standard job returns four different interpretations of the same idea.
In Discord, enter the /imagine command, add your text in the prompt field, and send it. Clear visual details usually matter more than long instructions. Describe the subject, environment, lighting, mood, and composition you actually want to see.
Website — use the Imagine bar on the Create page
Discord — use /imagine and enter the description in the prompt field
Prompt structure — subject, setting, composition, lighting, style, and important details
Prompt to adapt
futuristic Tokyo skyline at sunset, cinematic lighting, ultra-realistic, glowing windows, atmospheric haze, wide-angle cityscape
TipEnglish descriptive phrases are a dependable choice, but clarity is more important than length. Start concise and add only details that affect the image.
02 · Choose a candidate and refine it
Compare the four candidates and select the image closest to your goal. On the website, open the image to access Vary, Remix, Edit, and related controls. In Discord, the V buttons generate four new variations that keep the selected image's general composition and style.
In the latest Discord workflow, U1–U4 primarily separate the selected image from the grid and reveal more tools; they are not the same as the old one-click upscale buttons. Use Vary (Subtle) for small changes, Vary (Strong) for a wider reinterpretation, or rerun the original prompt when the overall direction is wrong.
Keep the subject and composition when the direction is already right
Change one variable at a time so you can judge what improved the result
Use a new prompt or reroll when none of the four candidates fits the goal
TipMidjourney becomes easier when you treat each generation as a controlled comparison instead of trying to make the first result perfect.
03 · Edit, increase resolution, and export
Use the web Editor to change selected regions, remove unwanted objects, replace a background, or extend the canvas with Pan and Zoom Out. Midjourney's current Editor can combine Remix, inpainting, panning, and outpainting. Check the edited image again before final export because regenerated areas can introduce new details.
With V8.1, a square SD image is typically 1024 × 1024 pixels, while HD produces a native 2048 × 2048 image. Midjourney's current documentation estimates about 0.8 GPU minutes for a four-image SD job and about 1.3 minutes for HD. Editing or extending an HD image can return it to SD, so upscale again after the edit when you need a final 2K file.
Explore quickly in SD while deciding on the subject and composition
Finish edits before spending extra GPU time on the final resolution
Use HD or an upscale option for posters, print, and other high-resolution output
Inspect faces, hands, text, repeated patterns, and image edges before download
TipThe efficient workflow is two-stage: explore several SD options first, then switch to HD only for the final candidate. GPU costs and interface labels may change as Midjourney updates.
Tutorial complete
Build a repeatable process before chasing perfection.
Apply the same structure to your own subject, generate once, observe, then change one variable. That is how a personal method begins.
Midjourney Official Showcase: Five Outstanding Works Explained
Study five standout Midjourney works through composition, print texture, color tension, object-specific styling, and caricature—complete with reusable prompts.
Recommended learning pathBasics → Prompts → Brand practice
What you will learn
After this tutorial, you will be able to
Read an AI image through visual history and design language
Identify the prompt phrases that control the strongest effect
Turn an admired work into a repeatable experiment
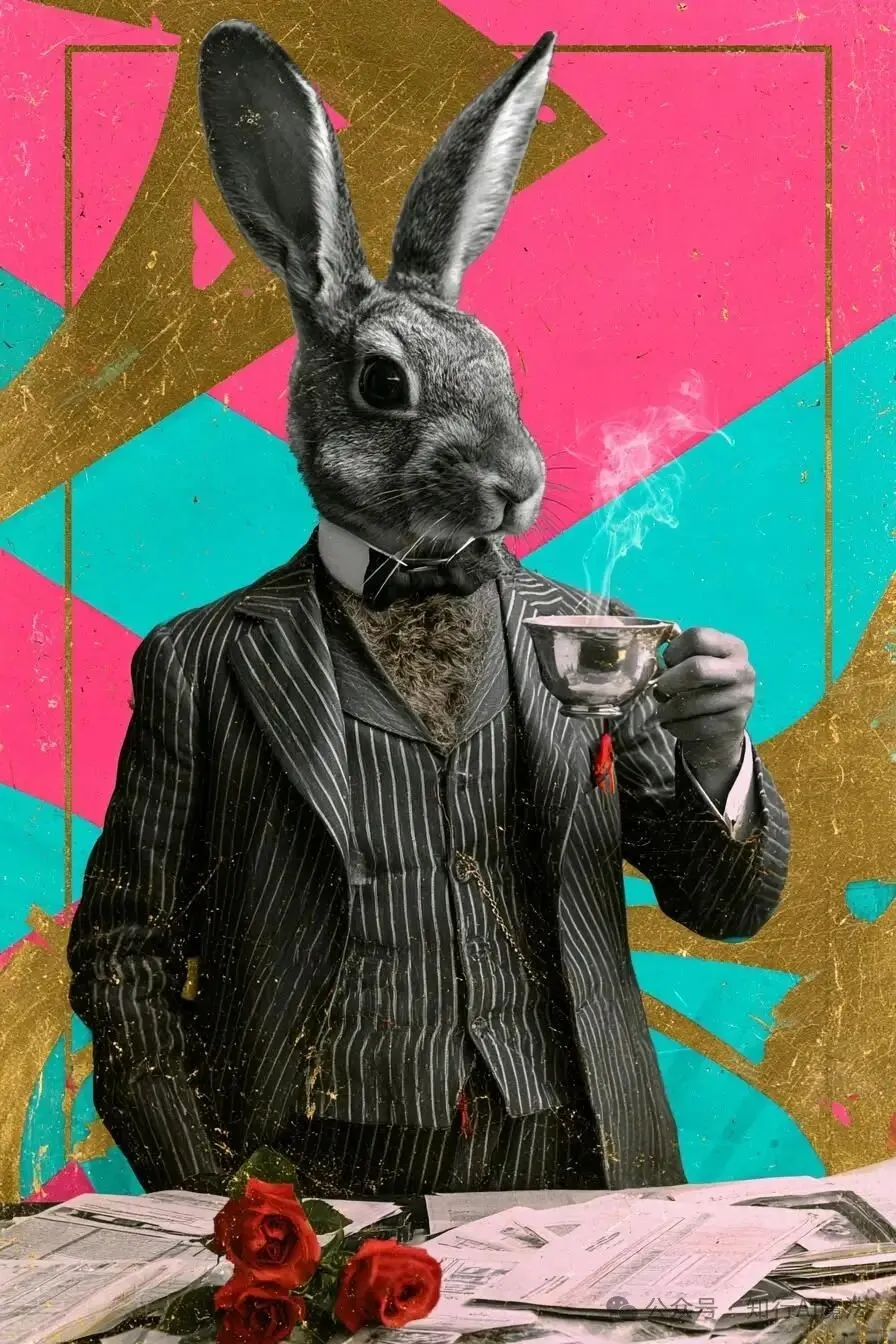
01 · The tea-party gentleman
The tea-party gentleman
The rabbit head and tailored human body continue a long satirical tradition of anthropomorphic portraiture. A photographic subject placed against gold, neon pink, and petrol blue creates a deliberate photomontage seam: respectable Victorian posture collides with Dada-like collage energy.
Prompt to adapt
a very old damaged art nouveau photo style 1900s of the portrait of an dandy man, anthropomorphic rabbit head, sharp human tailored body, with a hairy chest, wearing a sharp pinstripe three-piece suit, standing and holding a silver coffee cup with delicate steam rising, some business documents and papers scattered on the table, very old photograph. A few red roses. Strong abstract art deco background. Gold and Neon petrol blue and neon pink colours --ar 2:3
TipBind the photographic treatment to the subject, then describe the background as a separate collage layer. This keeps the head from dissolving into the graphic field.
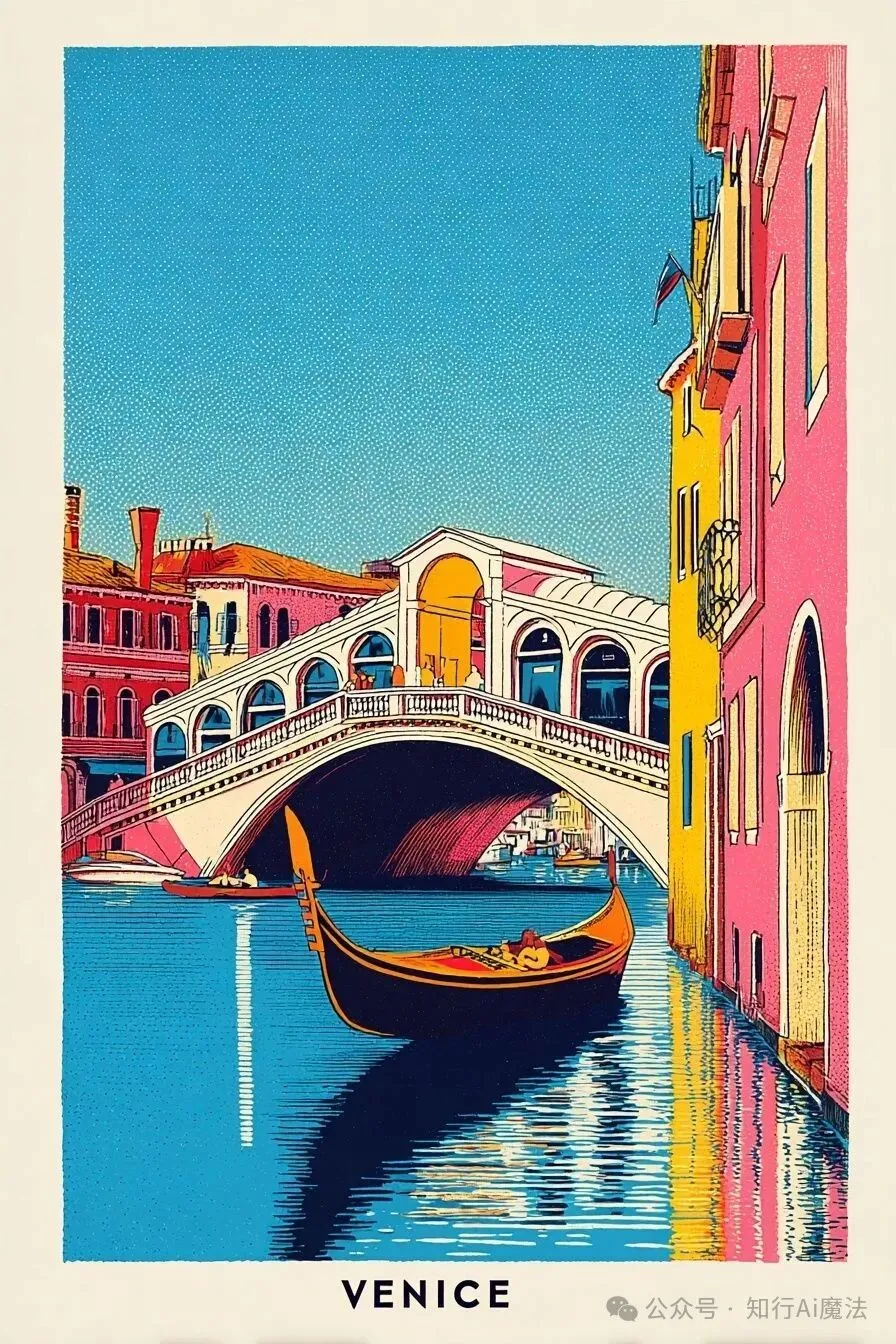
02 · Rialto Bridge
Rialto Bridge
Flat color, bold outlines, a balanced vertical layout, and visible halftone texture make the scene feel like a twentieth-century travel poster. Halftone is especially important: it turns a clean digital gradient into something that reads as ink on paper.
Prompt to adapt
A retro illustrated travel poster featuring the Rialto Bridge, with a gondola integrated into the scene. Clean mid-century style composition, bold flat colors, subtle print texture, balanced vertical layout, classic travel poster aesthetic. Clean title text reading "VENICE" placed beneath the illustration as a classic poster title --ar 2:3 --sref 3446709691 --raw
TipFor a convincing vintage poster, combine one landmark, one transport motif, flat colors, coarse outlines, and a clearly named print texture.
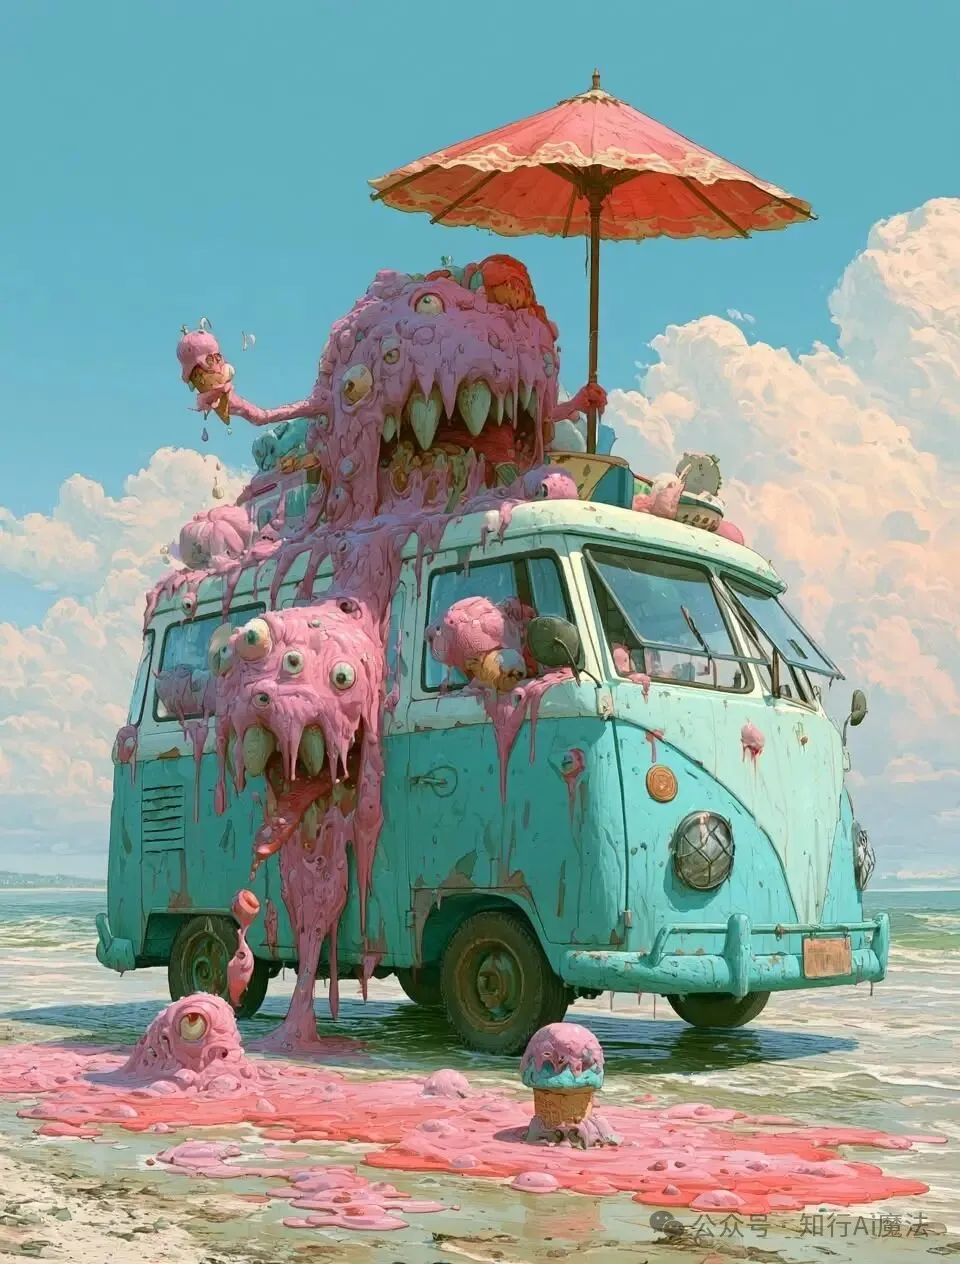
03 · Ice-cream disaster
Ice-cream disaster
The image holds attention through controlled contradiction. Mint green, strawberry pink, and soft clouds promise sweetness, while eyeballs, slime, and fangs introduce danger. Because cute color remains dominant, the horror reads as a sharp accent rather than the whole genre.
Prompt to adapt
Pop Surrealist illustration: a mint-green vintage Volkswagen bus parked on a damp beach, ice cream monsters going to the beach. The vehicle’s body is entirely covered by a melting pink ice cream monster with numerous round eyeballs and sharp white fangs. A red paper umbrella sits mounted on the roof, and strawberry-hued slime drips down the doors. Fluffy white clouds drift beneath a clear blue sky, with a candy pastel color palette blending cuteness and eeriness, rendered with highly detailed oil painting texture. The van is more profile than three-quarters --ar 22:29
TipKeep the pastel world as the base and use teeth, eyes, or slime sparingly. Reversing that balance produces conventional horror instead of pop surrealism.
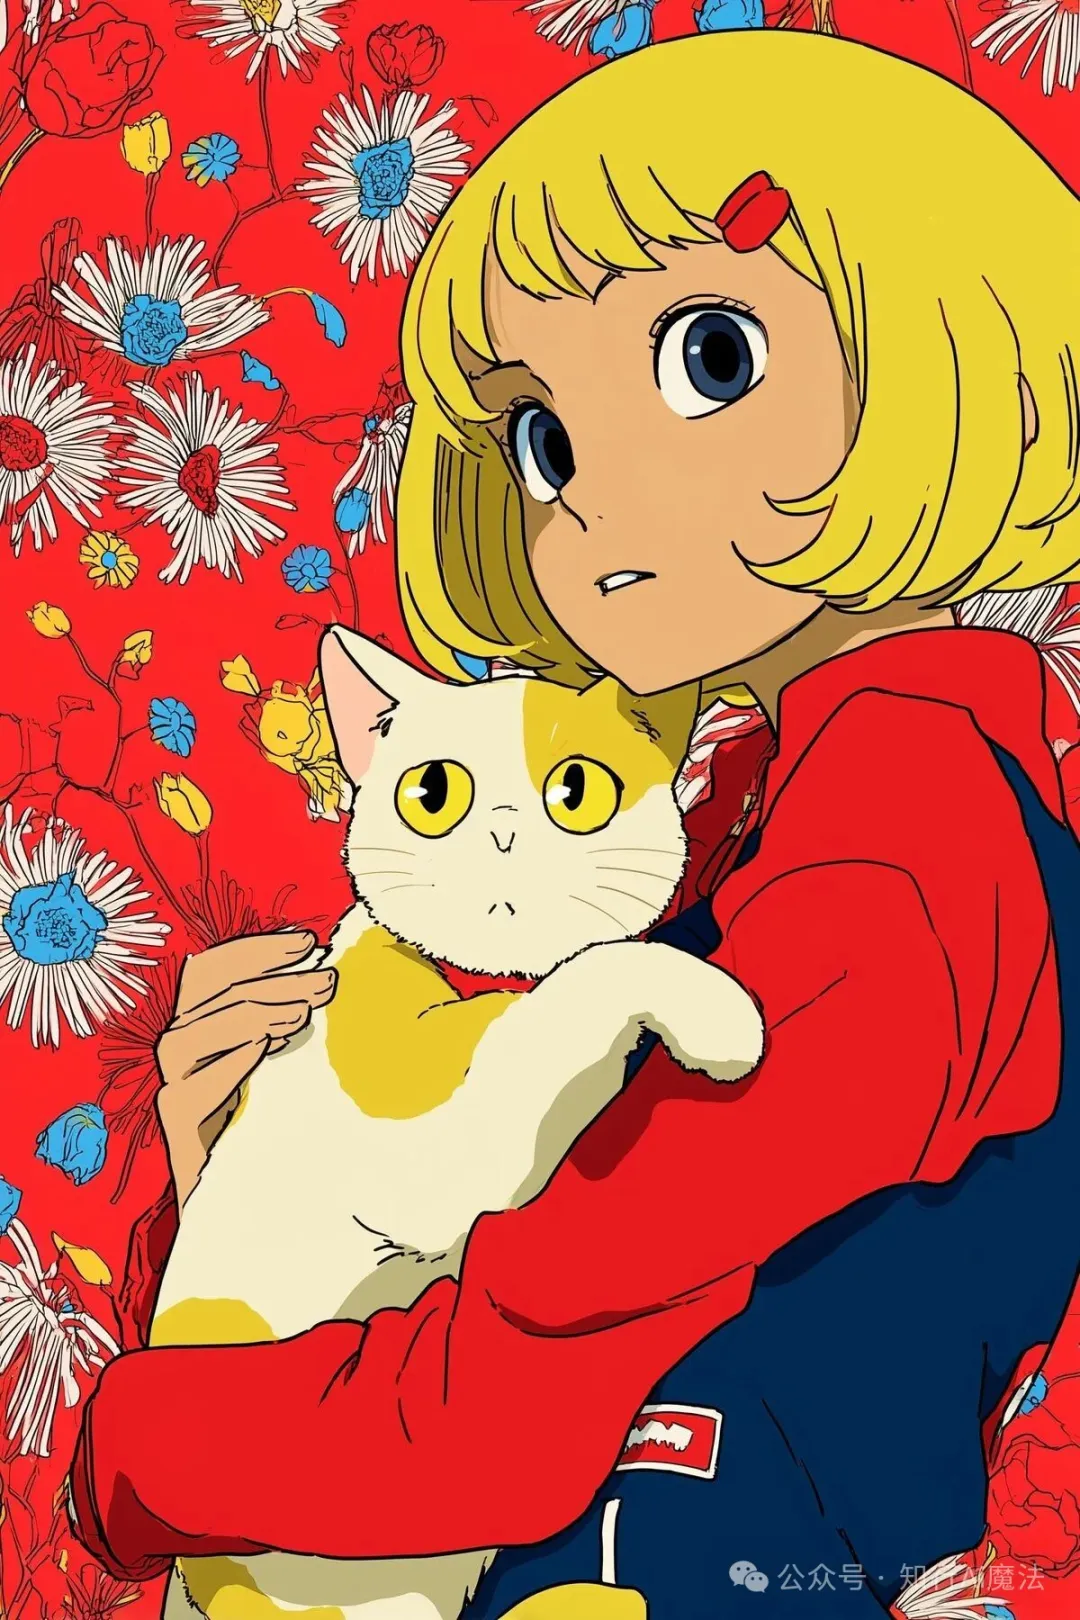
04 · The screentone cat
The screentone cat
The girl and wallpaper use clean cel-shaded color, but the cat alone receives visible manga screentone dots. Two printing logics coexist in one frame, creating depth that feels assembled rather than uniformly filtered.
Prompt to adapt
1980s retro anime style illustration, a blonde short-haired girl with a red hair clip wearing a red jacket, holding a white cat with yellow patches, the cat rendered with visible halftone screentone dots, background of vintage red floral wallpaper with white and blue daisies, cel shading, bold clean lineart, slightly worried expression, nostalgic Showa anime color palette --ar 2:3 --stylize 50 --sref 3879374764
TipAttach a texture to a named object—such as ‘the cat rendered with visible halftone screentone dots’—instead of placing the texture in the global style list.
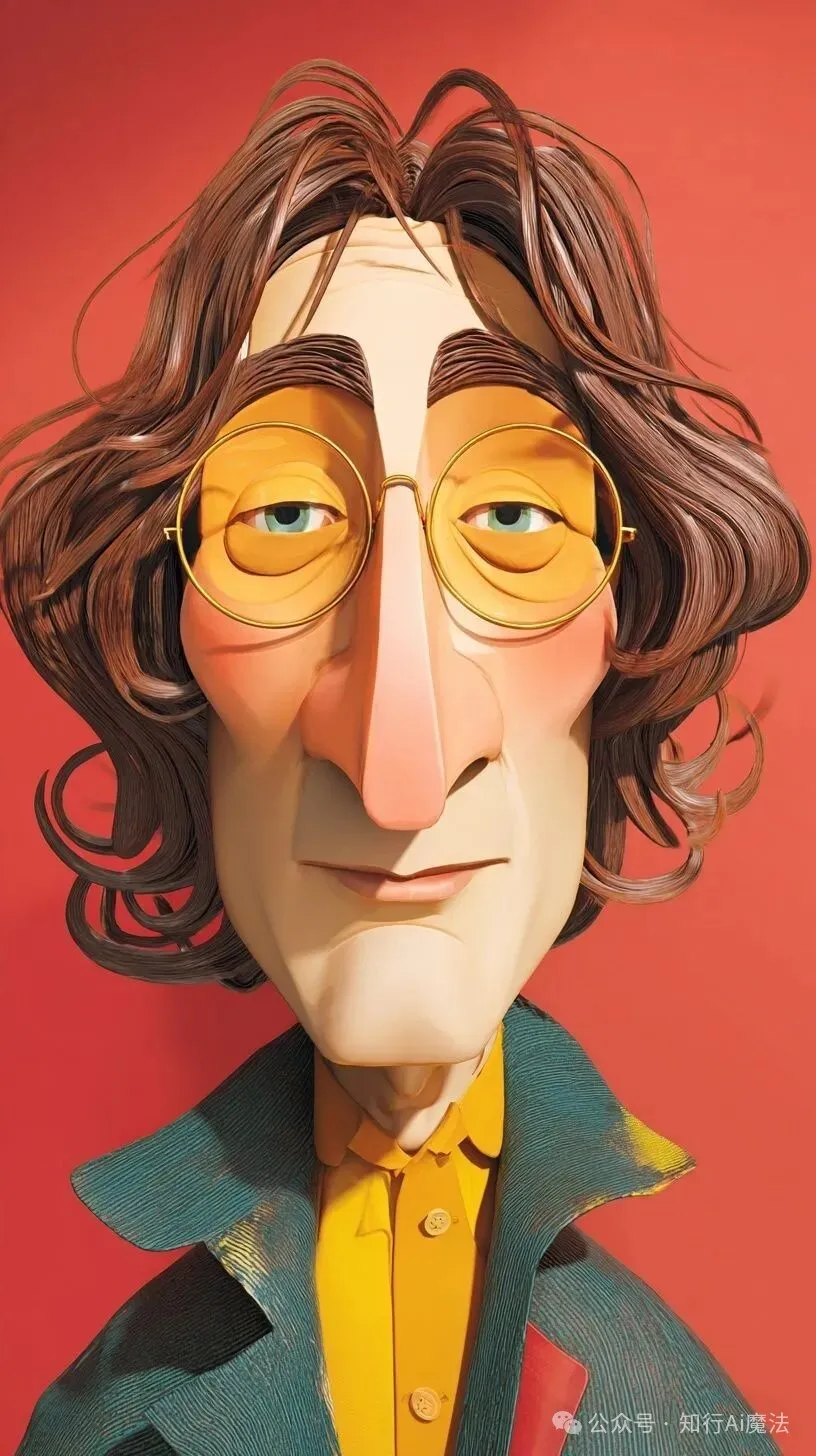
05 · The clay rocker
The clay rocker
Caricature works by amplifying the features that separate a face from an average one. Oversized glasses, a long nose, and a narrow face make the reference instantly legible, while matte clay and vinyl-toy cues soften the distortion and prevent it from feeling grotesque.
Prompt to adapt
Ilustración de caricatura comica de John Lennon con rasgos exagerados, cabeza y ojos sobredimensionados, apariencia hiperrealista similar a un juguete de vinilo. Arte de caricatura con características agrandadas y representación hiperrealista --ar 9:16 --stylize 50 --profile mppajsn --raw
TipChoose two or three signature features to exaggerate, then add a friendly material such as clay or vinyl to control the emotional tone.
Tutorial complete
Build a repeatable process before chasing perfection.
Apply the same structure to your own subject, generate once, observe, then change one variable. That is how a personal method begins.
Use a simple workflow to turn the image in your head into a clear prompt, then generate and refine your first result.
Recommended learning pathBasics → Prompts → Brand practice
What you will learn
After this tutorial, you will be able to
Write a well-structured first prompt
Control composition and lighting
Improve results through single-variable iterations
01 · Define what the image needs to do
Do not begin by stacking style keywords. First define the image's purpose, subject, and intended mood. These choices determine the composition and details you need later.
For example, the same coffee cup needs clear materials and negative space in an ecommerce image, while a brand poster depends more on atmosphere and a memorable visual idea.
Purpose: avatar, cover, poster, or product image
Subject: the most important person or object in the frame
Mood: calm, energetic, mysterious, or light
02 · Use a six-part prompt
Describe the subject, environment, composition, lighting, visual style, and key details—in that order. Give each part one job so the model can identify what matters.
Prompt to adapt
a young traveler in a silver raincoat, standing on a futuristic Shanghai street after rain, medium shot from a low angle, purple and blue neon signs creating side and rim light, cinematic photography, wet pavement reflections, light mist, crisp detail
TipKeep the first version concise. Too much information can pull attention away from the subject.
03 · Check only three things in the first result
Do not get stuck on small flaws yet. Use these three questions to decide whether the direction is right. If it is not, revise the prompt; if it is, continue refining.
Is the subject immediately recognizable and positioned for the intended use?
Do the light and color communicate the target mood?
Does the image have enough depth and negative space?
04 · Change one variable at a time
If you change the subject, camera, color, and style at once, you cannot tell what made the image better or worse. Keep what works and replace only one variable in each round.
A useful order is subject and composition first, lighting and color second, then materials, clothing, and environmental details.
Subject feels weak: remove secondary objects and clarify its position or action
Image feels flat: specify shot size, camera angle, and foreground–background layers
Mood feels wrong: define the main color, light direction, and whether the light is soft or hard
05 · Run a final check before export
Choose the result closest to your goal and upscale it. Before commercial use, manually inspect faces, hands, text, brand marks, and the structure of small objects.
Does the aspect ratio and resolution fit the publishing channel?
Do subject edges, facial features, and repeated textures look natural?
Did you save the final prompt and version so the result can be reproduced?
Tutorial complete
Build a repeatable process before chasing perfection.
Apply the same structure to your own subject, generate once, observe, then change one variable. That is how a personal method begins.
Replace vague adjectives with practical visual directions for the subject, camera, lighting, and materials.
Recommended learning pathBasics → Prompts → Brand practice
What you will learn
After this tutorial, you will be able to
Turn abstract ideas into visible details
Use composition and camera language with confidence
Remove instructions that conflict with each other
01 · Translate feelings into visible details
Words such as “premium,” “dreamy,” and “textured” are difficult to execute directly. Break the feeling into color, material, light, and spatial relationships for more consistent results.
Prompt to adapt
deep indigo background, translucent frosted-glass vase, soft side light casting a long narrow shadow, generous negative space, low-saturation cool palette
TipThis gives the model more visible information than “a premium, dreamy vase.”
02 · Give the subject an identity, state, and action
Writing only “a girl” produces an extremely broad range of results. Add an age cue, clothing, action, and gaze, but avoid assigning too many competing identities at once.
Identity: botanist, dancer, or architect
State: just stepped out of the rain or sorting specimens
Action: looking back, bending down, or holding an object in both hands
03 · Use shot size and camera angle to control the story
Shot size controls how close the viewer feels to the subject; camera angle changes the subject's psychological presence. Choose one main camera treatment.
Close-up: emphasizes expression, material, and detail
Medium shot: balances action and environment
Wide shot: emphasizes the scale of the space
Eye level feels natural, a low angle feels powerful, and a high angle feels observational
04 · Define the light's direction, softness, and color
Instead of writing only “cinematic lighting,” explain where the light comes from, whether the shadows are soft or sharp, and which colors appear in the environment.
Prompt to adapt
soft early-morning natural light from a window on the left, warm-white highlights, cool-gray shadows, extremely light mist in the air
05 · Put important information first and remove conflicts
Lead with the subject and core scene. Check whether the prompt combines incompatible directions, such as photorealism with flat illustration or hard midday sun with soft overcast light.
Keep one main direction for each type of information
Remove trendy words that do not support the image goal
Separate modules with commas so they are easy to replace
06 · Build your own controlled comparisons
Keep the subject and scene fixed, then replace only the camera, lighting, or material. Save each result with its prompt. After several rounds, you will have a vocabulary that is more useful than a generic keyword list.
Group A compares only shot sizes
Group B compares only dominant colors
Group C compares only lighting directions
Tag reusable phrases from successful results
Tutorial complete
Build a repeatable process before chasing perfection.
Apply the same structure to your own subject, generate once, observe, then change one variable. That is how a personal method begins.

 Recommended learning pathBasics → Prompts → Brand practice